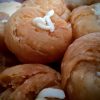
Pita is a very popular Middle Eastern and Mediterranean leavened flatbread characterized by a pocket between the two layers. Also known as the khubz, khubooz or Arabic bread, it comes roughly in 3 different sizes – large (8 inches), medium(6 inches) and small (5 inches).
The pocket is used as a wrap for fillings like shawarma, falafel, and vegetables. It can also be used to scoop dips like hummus, baba ganoush, etc or can be baked to make pita chips.
Traditionally Pita bread was made from Wholewheat flour. Though these days it’s predominantly made with all-purpose flour or even bread flour. A combination of wheat and other flours can also be used.
Making pita is very simple with the basic pantry items – flour, water, oil, yeast, salt, and sugar. Water can be replaced by half milk if you are not vegan. I have done it both ways and it worked just as well with water as with milk.
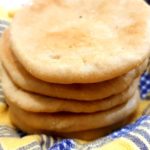
This is my version for a completely wholewheat pita, adapted from my wholewheat naan recipe making small changes to suit this recipe. All the pitas puffed up beautifully and remained soft, though they deflate on cooling.
The best thing about using wholewheat is that the flatbread does not become rubbery on cooling. And it felt very light on the tummy.

Pita in the oven
I used my old cast-iron skillet as the baking stone. It needs to be preheated at least for 20 minutes so that it’s nice and hot when the pitas are transferred to the oven. If you are using a baking pan or tray too, preheat them for a good amount of time.
If the baking base is not hot the pitas will not puff up completely. Also, I drizzle some oil on my skillet before putting the pitas in. This gives them a golden crust, which otherwise does not happen when baked in the oven.
You can make this on the stovetop too. Cover the pitas with a transparent lid and flip over once they fluff up.
I felt that they became darker and crispier than those baked in the oven and so prefer the ones that are baked though the choice is always yours.
I have used my stand mixer for kneading. People who do not have a stand mixer can do the following:
- Proof the yeast with the honey and half cup water.
- Take the flour, sugar, and salt on the countertop. Make a well in the center and add the proofed yeast mixture followed by the warm milk (if you are using milk). If you are not using milk just add another half cup of warm water.
- Mix well and let it rest for 5 minutes.
- Now start kneading by pulling and pushing the dough. Add the olive oil in between while kneading.
- Keep kneading for about 8-10 minutes till you get a tacky dough.
- Initially, it will seem sticky but will become tacky as you knead. You can add some flour if you find it too sticky.
- Transfer to an oiled bowl and let rise in a warm place until it doubles in size. Then proceed with the recipe.
I made a few small ones with hummus and shakshuka as side dishes and a few medium-sized ones as wrap for shawarma.

Give this a try and I guarantee you will never go back to the store-bought ones 🙂 .
Over to the recipe…
Wholewheat Pita
Ingredients
For proofing yeast
- ½ cup warm water
- 1 tsp active dry yeast
- ½ tsp honey
Rest of the ingredients
- 2 cups wholewheat flour (More for kneading and dusting)
- ½ cup milk
- 1 tbsp olive oil
- 1 tsp sugar
- 1 tsp salt
Instructions
- In the bowl of a stand mixer proof the yeast with the honey and the water for 10 minutes.

- Once the yeast blooms, add the rest of the ingredients and mix well with a ladle. Rest for 5 minutes.
- With the dough hook on, knead for around 8-10 minutes adding flour in between as needed till you get a tacky dough.
- Coat with a bit of oil and keep the dough in a warm place for at least an hour until it doubles in size. I normally prefer to keep in my stand mixer itself for rising.
- Once it rises punch down the dough. Transfer it to a floured surface and knead over itself for a few times.
- Spread the dough to the shape of a rectangle. Cut into even-sized balls. Roll them smoothly and rest them by keeping them covered with a towel for 10 minutes. Preheat the oven with the baking stone/tawa/baking sheet at 180°C for at least 20 minutes.
- After 10 minutes roll the balls into circles around 3.5 - 5 inches in diameter and about ¼ inch thick, using a rolling pin.
- Once the tawa is nice and hot, drizzle some oil over the top and transfer the pitas in two's or three's onto the tawa and bake for 10 minutes.
- In about 3-5 minutes the pitas will puff up. Now open the oven and flip the pitas carefully without deflating them.
- Bake the second side also for 3-5 minutes and remove from the oven.
- Keep the pitas wrapped in a towel so that they do not become dry. Serve with hummus or make sandwich wraps.
- This is how the inside of the pita looks.


Hema’s P.S
- Adding a bit of honey removes the bitterness that is sometimes seen in wholewheat flour.
- Normally in pitas, they do not add milk. So you can skip it if you do not want.
- The water to proof the yeast should be warm to the extent that you can stick your fingers in, that is slightly more than lukewarm.
- Add only as much flour as needed while kneading and knead till you get a tacky dough. Tacky means sticking to your hand when touched but still can be easily released, unlike a sticky dough. Tacky dough usually sticks to the bowl or counter and is not completely dry.
- Roll out the pitas evenly for it to puff up in the oven.
- Depending on the oven it may take a bit more time to puff up. So keep a close watch.
- Left over dough can be stored upto 4 days in the refrigerator. Just rest the dough for sometime on the counter to make it pliable and then make pitas.
- Left over pitas can be softened by heating up on a moderately hot tawa. Alternately, they can made into pita chips.

Do glance through my other bakes

← Back to Baking recipe Index page